Routes
- Routes
Conflito de rota
- Quando há a necessidade de carregar algo antes de mostrar a tela, podemos usar o
[resolver](https://blog.devgenius.io/how-to-add-resolver-in-angular-7ca343f51452)
A ordem das rotas no routing.module importa
- Dessa forma está correto
const routes: Routes = [
  {
    path: '',
    component: EmpresaComponent,
    canActivate: [AuthGuard,RoleGuard],
    data: {
      title: 'Empresa',
      permissaoEsperada: [Permissao.Administrador]

    }
  },
  {
    path: 'listagem',
    component: ListagemEmpresaComponent,
    canActivate: [AuthGuard,RoleGuard],
    data: {
      title: 'listagem',
      permissaoEsperada: [Permissao.Administrador]

    }
  },
  {
    path: ':codigoEmpresa',
    component: EmpresaComponent,
    canActivate: [AuthGuard,RoleGuard],
    data: {
      title: 'Empresa',
      permissaoEsperada: [Permissao.Administrador]

    }
  }
];
- Dessa forma , nunca era aberto o
listagem
const routes: Routes = [
  {
    path: '',
    component: EmpresaComponent,
    canActivate: [AuthGuard,RoleGuard],
    data: {
      title: 'Empresa',
      permissaoEsperada: [Permissao.Administrador]

    }
  },
  {
    path: ':codigoEmpresa',
    component: EmpresaComponent,
    canActivate: [AuthGuard,RoleGuard],
    data: {
      title: 'Empresa',
      permissaoEsperada: [Permissao.Administrador]

    }
  },
  {
    path: 'listagem',
    component: ListagemEmpresaComponent,
    canActivate: [AuthGuard,RoleGuard],
    data: {
      title: 'listagem',
      permissaoEsperada: [Permissao.Administrador]

    }
  }
];
-
A tag
router-outletpossui alguns retornos de eventos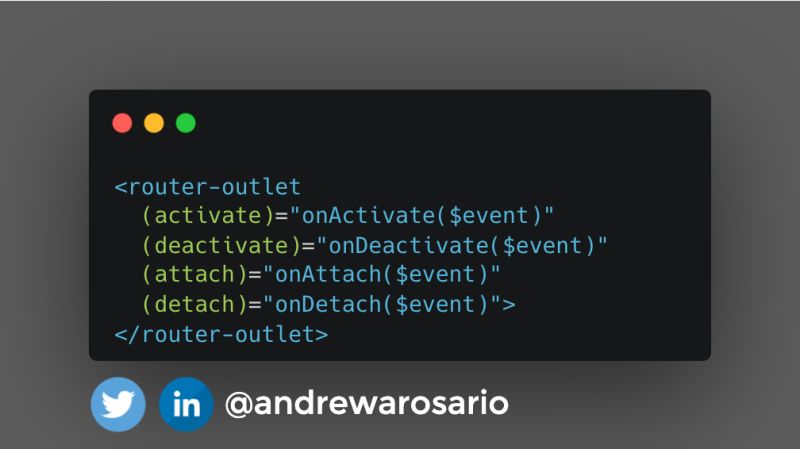
Animations
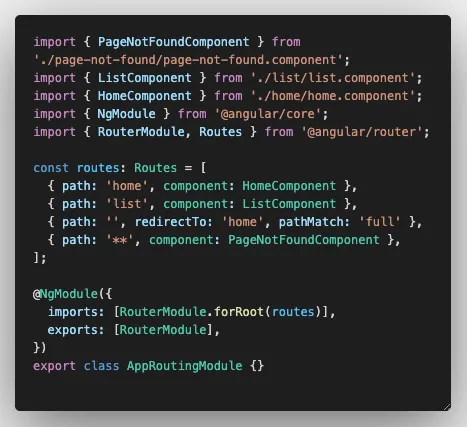
Exemplo de rotas com tratamento 404
Child Routes
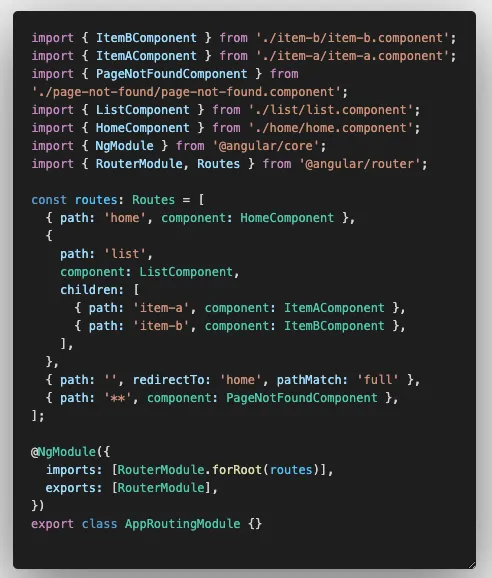
- list/item-a
- list/item-b
Route in V14
New Router API for standalone
We’ve introduced a way to use the Router without the need for RouterModule and improved tree shaking for reduced bundle sizes. First, let’s focus on the new router integration API.
Here’s how to use the router without a RouterModule. In the bootstrapApplication function, we provide the router configuration to the providers array using the provideRouter function. The function accepts an array of application routes. Here’s an example:
// Bootstrap the main application component with routing capabilitiesconst appRoutes: Routes = […];
bootstrapApplication(AppComponent, {
  providers: [
    provideRouter(appRoutes),
  ]
});
Compare this to the existing way to set up the Router in an application that required a module:
const appRoutes: Routes = […];bootstrapApplication(AppComponent, {
  providers: [
    importProvidersFrom(RouterModule.forRoot(appRoutes)),
  ]
});
Tree shaking
The new provideRouter API allows developers to tree-shake major pieces of the router API. This is the first time we’ve had the ability to enable this level of tree-shaking in the Angular router. Now teams can enjoy smaller bundle sizes.
The design of the RouteModule API prevents bundlers from being able to remove unused Router features. With the RouteModule API the following features are included in the production bundle even if not enabled:
HashLocationStrategy— generally used for legacy routing via updating the fragment instead of the path- preloading, scrolling, and logic for blocking app loading until navigation finishes for SSR.
The new provideRouter API changes this behavior. The features in the list above are no longer included in the production bundle if they are not enabled.
In our testing with the new API, we found that removing these unused features from the bundle resulted in an 11% reduction in the size of the router code in the application bundle when no features are enabled.
Here’s an example of opting in to preloading using the withPreloading function :
const appRoutes: Routes = [];bootstrapApplication(AppComponent, {
  providers: [
    provideRouter(appRoutes, withPreloading(PreloadAllModules))
  ]
});
Now supporting functional router guards
Router guards require too much boilerplate…
- most Angular developers at some point, probably
We’ve received feedback from multiple developers that amounts to developers wanting less boilerplate and more productivity. Let’s cover some of the exciting new changes that move us closer to this goal.
Functional router guards with inject() are lightweight, ergonomic, and more composable than class-based guards.
Here’s an example of functional guard that takes a component as a parameter and returns whether or not a route can be deactivated based on the component’s hasUnsavedChanges property:
const route = {
  path: ‘edit’,
  component: EditCmp,
  canDeactivate: [
    (component: EditCmp) => !component.hasUnsavedChanges
  ]
};
Additionally, these functional guards can still inject dependencies with inject from @angular/core :
const route = {
  path: ‘admin’,
  canActivate: [() => inject(LoginService).isLoggedIn()]
};
The Router APIs previously required guards and resolvers to be present in Angular’s dependency injection. This resulted in unnecessary boilerplate code. Let’s consider two examples.
In the first example, here’s the code required to provide a guard using an InjectionToken:
const UNSAVED_CHANGES_GUARD = new InjectionToken<any>('my_guard', {
  providedIn: 'root',
  factory: () => (component: EditCmp) => !component.hasUnsavedChanges
});const route = {
  path: 'edit',
  component: EditCmp,
  canDeactivate: [UNSAVED_CHANGES_GUARD]
};
In this second example, here’s the code required for providing a guards as an injectable class:
@Injectable({providedIn: 'root'})
export class LoggedInGuard implements CanActivate {
  constructor(private loginService: LoginService) {}  canActivate() {
    return this.loginService.isLoggedIn();
  }
}const route = {
  path: 'admin',
  canActivate: [LoggedInGuard]
};
Notice that even when we want to write a simple guard that has no dependencies as in the first example, we still have to write either an InjectionToken or an Injectable class. With functional guards developers can create guards, even guards with dependencies, with much less boilerplate.
Functional guards are composable
Functional guards are also more composable. A common feature request for the Router is to provide the option for guards to execute sequentially rather than all at once. Without this option in the Router implementing this type of behavior in an application would be difficult. This is smoother to implement with functional guards. There’s even an example test in the router code to demonstrate this behavior.
Let’s review the code to get a better understanding of how this works:
function runSerially(guards: CanActivateFn[]|
                            CanActivateChildFn[]):
                            CanActivateFn|CanActivateChildFn {
  return (
          route: ActivatedRouteSnapshot,
          state: RouterStateSnapshot) => {
            const injector = inject(EnvironmentInjector);
            const observables = guards.map(guard => {
              const guardResult = injector.runInContext(
                () => guard(route, state));
              return wrapIntoObservable(guardResult).pipe(first());
            });            return concat(…observables).pipe(
                    takeWhile(v => v === true), last());
            };
}
With functional guards, you can create factory-like functions that accept a configuration and return a guard or resolver function. With this pattern, we now also have configurable guards and resolvers, another common feature request. The runSerially function is a factory-like function that accepts a list of guard functions and returns a new guard.
function runSerially(guards: CanActivateFn[]|CanActivateChildFn[]): CanActivateFn|CanActivateChildFn
First, we obtain a reference to the current injector with:
const injector = inject(EnvironmentInjector);
When functional guards want to use dependency injection (DI), they must call inject synchronously. Each guard may execute asynchronously and may inject dependencies of their own. We need the reference to the current injector immediately so we can keep running each of them inside the same injection context:
const guardResult = injector.runInContext(() => guard(route, state));
This is also exactly how the router enables the function guards feature.
Because guards can return an Observable, a Promise, or a synchronous result, we use our wrapIntoObservable helper to transform all results to an Observable and take only the first emitted value:
return wrapIntoObservable(guardResult).pipe(first());
We take all of these updated guard functions, execute them one after another (with concat) and only subscribe to the result while each of them indicate the route can be activated (i.e, returning true):
concat(…observables).pipe(takeWhile(v => v === true), last());
That’s it. We enabled running functional guards sequentially with less than 10 lines of code. We can now call it in our Route config like this:
{
  path: ‘hello-world’,
  component: HelloWorld,
  canActivate: [runSerially(guard1, guard2, guard3)]
}
Parameters route
Parameters route
To configure a route in Angular that accepts parameters and retrieves them, you can follow these steps:
- Define the route in the
routing.module.tsfile:
const routes: Routes = [
  {
    path: 'user/:id',
    component: UserComponent
  }
];
- In the component where you want to retrieve the parameter, import the
ActivatedRoutefrom@angular/router:
import { ActivatedRoute } from '@angular/router';
- Inject the
ActivatedRoutein the component's constructor:
constructor(private route: ActivatedRoute) { }
- Retrieve the parameter value using the
paramsobservable:
ngOnInit() {
  this.route.params.subscribe(params => {
    const userId = params['id'];
    // Use the userId as needed
  });
}
With these steps, you have configured a route that accepts a parameter and can retrieve it in the component. You can access the parameter value using the params observable provided by the ActivatedRoute.
Parameters route
To configure a route in Angular that accepts parameters and retrieves them, you can follow these steps:
- Define the route in the
routing.module.tsfile:
const routes: Routes = [
  {
    path: 'user/:id',
    component: UserComponent
  }
];
- In the component where you want to retrieve the parameter, import the
ActivatedRoutefrom@angular/router:
import { ActivatedRoute } from '@angular/router';
- Inject the
ActivatedRoutein the component's constructor:
constructor(private route: ActivatedRoute) { }
- Retrieve the parameter value using the
paramsobservable:
ngOnInit() {
  this.route.params.subscribe(params => {
    const userId = params['id'];
    // Use the userId as needed
  });
}
With these steps, you have configured a route that accepts a parameter and can retrieve it in the component. You can access the parameter value using the params observable provided by the ActivatedRoute.
Populating route parameters | Template and Component Class
//template
<a [routerLink]= "['/products', 'product.id', 'edit']">

//component class
this.router.navigate(['/products', this.product.id]);