Dynamic Island
- Dynamic Island
Since Apple launched iPhone 14 pro & pro max series, they revamped their iPhone notch with a unique element called “Dynamic Island”.
It is a pill-shaped area beyond housing the camera hardware. This innovative feature also acts as a dynamic hub for important iPhone alerts. It possesses the ability to change its shape and size to display various alerts and notifications. Apple has integrated this area into the iOS system, allowing users to interact with it to view notifications, control their music, and perform additional functions.
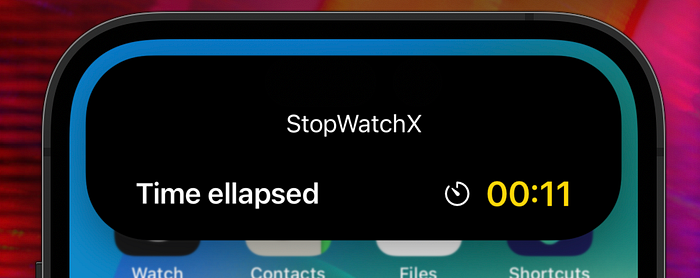
Now, as a developer, you all must be curious enough about how to implement such features which support this pill-shaped notch.
So in this article, we shall be covering how to build such features for the dynamic island with Flutter & SwiftUI.
Plan of attack
The dynamic island is a core functionality of iOS development, so first, we have to create a method channel through which the native side code can be invoked from Flutter.
For those who don’t know what a method channel is, it is just a way of communicating between our flutter code and native side code by creating some unique channels through which instructions can be delivered from one side to another.
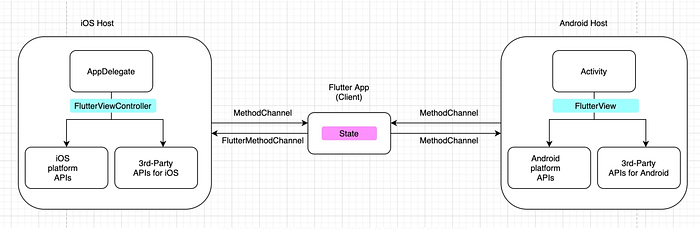
You might be wondering how this data can be passed from Flutter to native, so for that we can create some similar dataModels on both sides and pass the data in JSON like Map format and reconstruct the models on either side from it.
Now, let’s dive right in!
Flutter side implementation
First, we shall be creating a manager class that shall have this method channel code and shall create 3 methods, i.e. to start, update & stop our live activity.
import 'package:flutter/services.dart';

class DynamicIslandManager {
  final String channelKey;
  late final MethodChannel _methodChannel;

  DynamicIslandManager({required this.channelKey}) {
    _methodChannel = MethodChannel(channelKey);
  }

  Future<void> startLiveActivity() async {}

  Future<void> updateLiveActivity() async {}

  Future<void> stopLiveActivity() async {}

}
So we shall be making a stopwatch app and for passing this stopwatch timer data to native methods we need to make a dataModel and pass it to the method channel invocation in JSON like Map format.
class DynamicIslandStopwatchDataModel {
  final int elapsedSeconds;

  DynamicIslandStopwatchDataModel({
    required this.elapsedSeconds,
  });

  Map<String, dynamic> toMap() {
    return <String, dynamic>{
      'elapsedSeconds': elapsedSeconds,
    };
  }
}
Each method shall be having the following code to invoke the methods available on the native side (we shall be creating them soon!)
import 'dart:developer';

import 'package:flutter/services.dart';

class DynamicIslandManager {
  final String channelKey;
  late final MethodChannel _methodChannel;

  DynamicIslandManager({required this.channelKey}) {
    _methodChannel = MethodChannel(channelKey);
  }

  Future<void> startLiveActivity({required Map<String, dynamic> jsonData}) async {
    try {
      await _methodChannel.invokeListMethod('startLiveActivity', jsonData);
    } catch (e, st) {
      log(e.toString(), stackTrace: st);
    }
  }

  Future<void> updateLiveActivity({required Map<String, dynamic> jsonData}) async {
    try {
      await _methodChannel.invokeListMethod('updateLiveActivity', jsonData);
    } catch (e, st) {
      log(e.toString(), stackTrace: st);
    }
  }

  Future<void> stopLiveActivity() async {
    try {
      await _methodChannel.invokeListMethod('stopLiveActivity');
    } catch (e, st) {
      log(e.toString(), stackTrace: st);
    }
  }
}
here, startLiveActivity , stopLiveActivity & updateLiveActivity are the method names available on the native side that have to be called respectively.
await _methodChannel.invokeListMethod('<some function name>', jsonData);
The above line of code calls some method available on swift side from flutter and jsonData is data that has to be transfered from flutter to show on dynamic island.
So this was the initial configuration done for running this on flutter side. Below this, I have created a basic stopwatch app UI with method calls.
import 'dart:async';
import 'package:flutter/material.dart';
import 'package:flutter_dynamic_island_implementation/dynamic_island_manager.dart';
import 'package:flutter_dynamic_island_implementation/dynamic_island_stopwatch_data_model.dart';

void main() {
  runApp(const StopwatchApp());
}

class StopwatchApp extends StatelessWidget {
  const StopwatchApp({super.key});
  @override
  Widget build(BuildContext context) {
    return MaterialApp(
      title: 'Stopwatch App',
      theme: ThemeData(
        primarySwatch: Colors.blue,
      ),
      home: const StopWatchScreen(),
    );
  }
}

class StopWatchScreen extends StatefulWidget {
  const StopWatchScreen({super.key});

  @override
  State<StopWatchScreen> createState() => _StopWatchScreenState();
}

class _StopWatchScreenState extends State<StopWatchScreen> {
  int seconds = 0;
  bool isRunning = false;
  Timer? timer;

  /// channel key is used to send data from flutter to swift side over
  /// a unique bridge (link between flutter & swift)
  final DynamicIslandManager diManager = DynamicIslandManager(channelKey: 'DI');

  void startTimer() {
    setState(() {
      isRunning = true;
    });

    // invoking startLiveActivity Method
    diManager.startLiveActivity(
      jsonData: DynamicIslandStopwatchDataModel(elapsedSeconds: 0).toJson(),
    );

    timer = Timer.periodic(const Duration(seconds: 1), (timer) {
      setState(() {
        seconds++;
      });

      // invoking the updateLiveActivity Method
      diManager.updateLiveActivity(
        jsonData: DynamicIslandStopwatchDataModel(
          elapsedSeconds: seconds,
        ).toJson(),
      );
    });
  }

  void stopTimer() {
    timer?.cancel();
    setState(() {
      seconds = 0;
      isRunning = false;
    });

    // invoking the stopLiveActivity Method
    diManager.stopLiveActivity();
  }

  @override
  void dispose() {
    timer?.cancel();
    super.dispose();
  }

  @override
  Widget build(BuildContext context) {
    return Scaffold(
      appBar: AppBar(
        title: const Text('Stopwatch App'),
      ),
      body: Center(
        child: Column(
          mainAxisAlignment: MainAxisAlignment.center,
          children: <Widget>[
            Text(
              'Stopwatch: $seconds seconds',
              style: const TextStyle(fontSize: 24),
            ),
            const SizedBox(height: 20),
            Row(
              mainAxisAlignment: MainAxisAlignment.center,
              children: <Widget>[
                ElevatedButton(
                  onPressed: isRunning ? null : startTimer,
                  child: const Text('Start'),
                ),
                const SizedBox(width: 20),
                ElevatedButton(
                  onPressed: isRunning ? stopTimer : null,
                  child: const Text('Stop'),
                ),
              ],
            ),
          ],
        ),
      ),
    );
  }
}
Native side implementation
Project settings on Xcode
First of all, we have to do some configurations from xcode in our project.
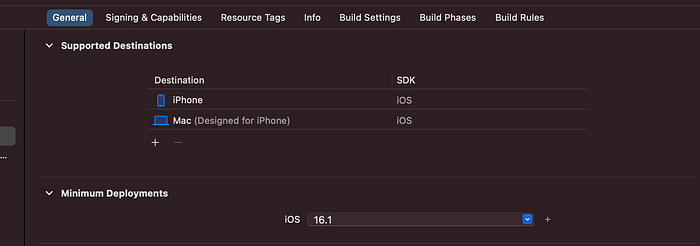
- Open your project on Xcode and in General Tab set the minimum deployment to
iOS 16.1.
- In
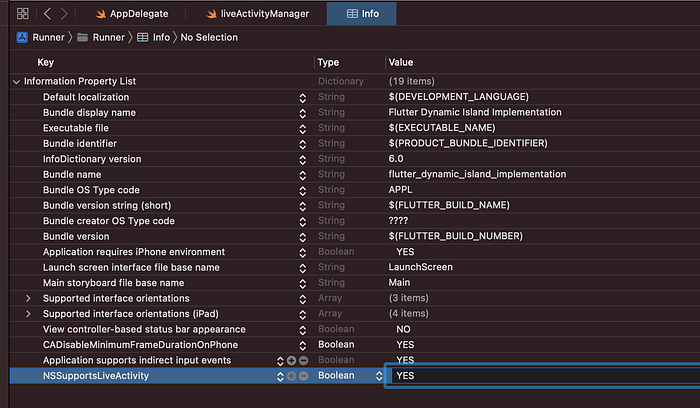
Info.plistadd a new keyNSSupportsLiveActivitiesand set its value toYES(Boolean).
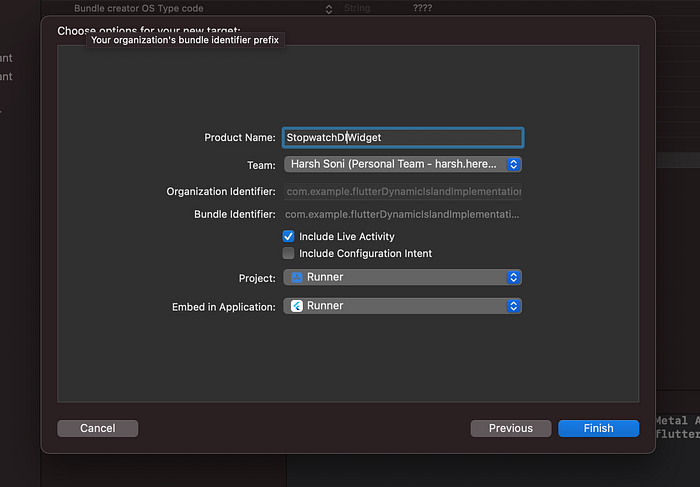
- From action bar, select File > New > Target and search for
WidgetExtensionand create a new widget.
-
Delete the
StopwatchDIWidget.swiftfile as right now we are only focused on creating the live activity for the app. -
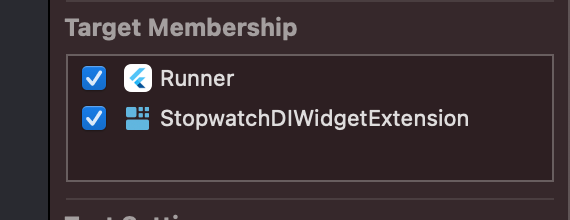
Open the
StopwatchDIWidgetLiveActivity.swiftfile and on top-right side of xcode click the inspector icon and select the Runner checkbox under Target Membership.
Code side implementation
Let’s create a class LiveActivityManager that shall be managing these live activities for our dynamic island. This class shall be containing 3 methods : startLiveActivity() , updateLiveActivity() and stopLiveActivity() .
import ActivityKit
import Flutter
import Foundation

class LiveActivityManager {

  func startLiveActivity(data: [String: Any]?, result: FlutterResult) {}

  func updateLiveActivity(data: [String: Any]?, result: FlutterResult) {}

  func stopLiveActivity(result: FlutterResult) {}
}
Now, each of the method comes with its own functionality (obvious duh!) startLiveActivity (as the name suggests) refers to the initiation of the liveActivity which is responsible for invocation the dynamic island functionality.
Similarly, stopLiveActivity and updateLiveActivity are responsible for terminating and data updating on the dynamic island.
Next up, go to StopWatchDIWidgetLiveActivity.swift and modify the StopwatchDIWidgetAttributes struct (as shown in snippet).
This attribute struct serves as the data model that holds information to be displayed on the UI (directly from Flutter) and can also manipulate the UI accordingly.
struct StopwatchDIWidgetAttributes: ActivityAttributes {
    public typealias stopwatchStatus = ContentState

    public struct ContentState: Codable, Hashable {
        var elapsedTime: Int
    }
}
Now let’s just inject some functionalities to those live Activity methods in our LiveActivityManager class.
// the data variable holds jsonData coming from flutter
func startLiveActivity(data: [String: Any]?, result: FlutterResult) {

  let attributes = StopwatchDIWidgetAttributes()

  if let info = data as? [String: Any] {
    let state = StopwatchDIWidgetAttributes.ContentState(
      elapsedTime: info["elapsedTime"] as? Int ?? 0
    )

    // the request method here is responsible for invocation of dynamic island
    stopwatchActivity = try? Activity<StopwatchDIWidgetAttributes>.request(
      attributes: attributes, contentState: state, pushType: nil)
  } else {
    result(FlutterError(code: "418", message: "Live activity didn't invoked", details: nil))
  }
}
func updateLiveActivity(data: [String: Any]?, result: FlutterResult) {
  if let info = data as? [String: Any] {
    let updatedState = StopwatchDIWidgetAttributes.ContentState(
      elapsedTime: info["elapsedTime"] as? Int ?? 0
    )

    Task {
      /// the request method here is responsible for updating the data
      /// of the dynamic island
      await stopwatchActivity?.update(using: updatedState)
    }
  } else {
    result(FlutterError(code: "418", message: "Live activity didn't updated", details: nil))
  }
}
func stopLiveActivity(result: FlutterResult) {
  do {
    Task {
      // end method simply dismisses the dynamic island
      await stopwatchActivity?.end(using: nil, dismissalPolicy: .immediate)
    }
  } catch {
    result(FlutterError(code: "418", message: error.localizedDescription, details: nil))
  }
}
Now, the only thing remaining is the UI for dynamic island! (woohoo, we’ve came this far!)
The whole UI for Dynamic Island has to be created in SwiftUI, so for this article, I’ve made a very simple UI (you can also tweak it accordingly).
This UI code has to be written in StopwatchDIWidgetLiveActivity struct.
Remove the existing code from the struct and you can follow the code below:
struct StopwatchDIWidgetLiveActivity: Widget {

    func getTimeString(_ seconds: Int) -> String {
        let hours = seconds / 3600
        let minutes = (seconds % 3600) / 60
        let seconds = (seconds % 3600) % 60

        return hours == 0 ?
                String(format: "%02d:%02d", minutes, seconds)
                : String(format: "%02d:%02d:%02d", hours, minutes, seconds)
    }

    var body: some WidgetConfiguration {
        ActivityConfiguration(for: StopwatchDIWidgetAttributes.self) { context in
            // Lock screen/banner UI goes here
            HStack {
                Text("Current time ellapsed")
                    .font(.system(size: 20, weight: .semibold))
                    .foregroundColor(.white)
                Spacer()
                Image(systemName: "timer")
                    .foregroundColor(.white)
                Spacer().frame(width: 10)
                Text(getTimeString(context.state.elapsedTime))
                    .font(.system(size: 24, weight: .semibold))
                    .foregroundColor(.yellow)
            }
            .padding(.horizontal)
            .activityBackgroundTint(Color.black.opacity(0.5))

        } dynamicIsland: { context in
            DynamicIsland {
                // Expanded UI goes here.  Compose the expanded UI through
                // various regions, like leading/trailing/center/bottom
                DynamicIslandExpandedRegion(.center) {
                    VStack(alignment: .center) {
                        Text("StopWatchX")
                        Spacer().frame(height: 24)
                        HStack {
                            Text("Time ellapsed")
                                .font(.system(size: 20, weight: .semibold))
                                .foregroundColor(.white)
                            Spacer()
                            Image(systemName: "timer")
                            Spacer().frame(width: 10)
                            Text(getTimeString(context.state.elapsedTime))
                                .font(.system(size: 24, weight: .semibold))
                                .foregroundColor(.yellow)
                        }.padding(.horizontal)
                    }
                }
            } compactLeading: {
                Image(systemName: "timer").padding(.leading, 4)
            } compactTrailing: {
                Text(getTimeString(context.state.elapsedTime)).foregroundColor(.yellow)
                    .padding(.trailing, 4)
            } minimal: {
                Image(systemName: "timer")
                    .foregroundColor(.yellow)
                    .padding(.all, 4)
            }
            .widgetURL(URL(string: "http://www.apple.com"))
            .keylineTint(Color.red)
        }
    }
}
And to visualise this on xcode preview, update the preview struct in same file accordingly:
struct StopwatchDIWidgetLiveActivity_Previews: PreviewProvider {
    static let attributes = StopwatchDIWidgetAttributes()
    static let contentState = StopwatchDIWidgetAttributes.ContentState(elapsedTime: 2324234)

    static var previews: some View {
        attributes
            .previewContext(contentState, viewKind: .dynamicIsland(.compact))
            .previewDisplayName("Island Compact")
        attributes
            .previewContext(contentState, viewKind: .dynamicIsland(.expanded))
            .previewDisplayName("Island Expanded")
        attributes
            .previewContext(contentState, viewKind: .dynamicIsland(.minimal))
            .previewDisplayName("Minimal")
        attributes
            .previewContext(contentState, viewKind: .content)
            .previewDisplayName("Notification")
    }
}
…and that’s it! That was all the stuff required for implementing Dynamic Island and linking it to Flutter code!
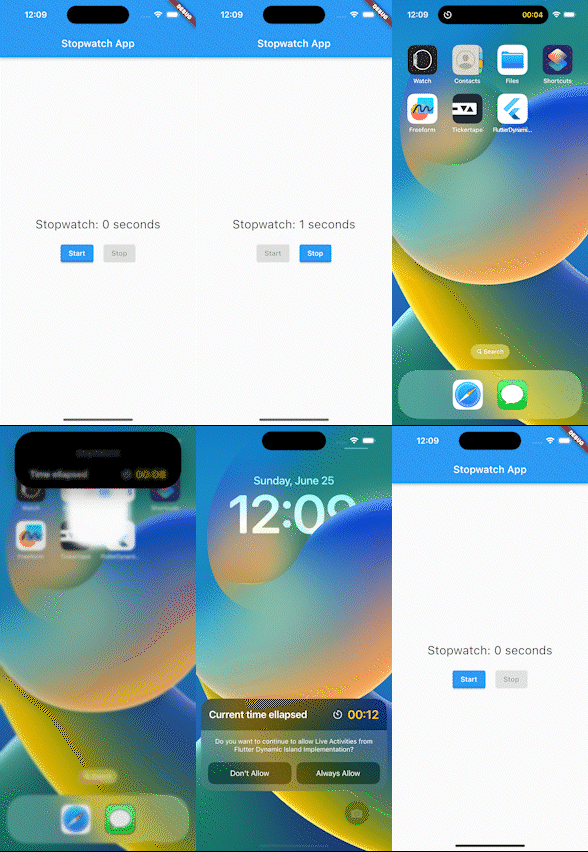
Implementation Demo GIF
You can access the whole project over the Github Repository.
Hope you liked the article!
Let’s connect over LinkedIn 👋🏻